Nov 30, 2011

Granola Bites

I love the way my house smells after baking. It's so cozy. What I don't love about making granola bars is cutting them into bars. I always seem to cut some the wrong size, or pieces break off or I cut them at the wrong time and it's impossible to get my knife through. Sound familiar?

In my lazy-girl attempt to cut the hassle, I decided to bake granola bars using a cupcake sheet, thereby making them no-cut granola bites! This weekend, I made granola bars inspired by my favorite from Trader Joe's.


These tasty devils are a little chewy, a little crunchy, a little sweet, and a little savory. They're also loaded with a TON of sugar! See what I mean....


"Brown rice syrup" = sugar. "Evaporated cane sugar" = sugar. "Barley malt extract" = more sugar. Plus there is even MORE sugar in the chocolate chips and dried cranberries. So much for healthy, right?

For the Tiffany the Dietitian version, the texture is more crunchy than chewy. The ingredients are whole and simple with very minimal added sugar.


I have to write these things down or I forget....


Throw all the ingredients in a big bowl and mix-it-up.


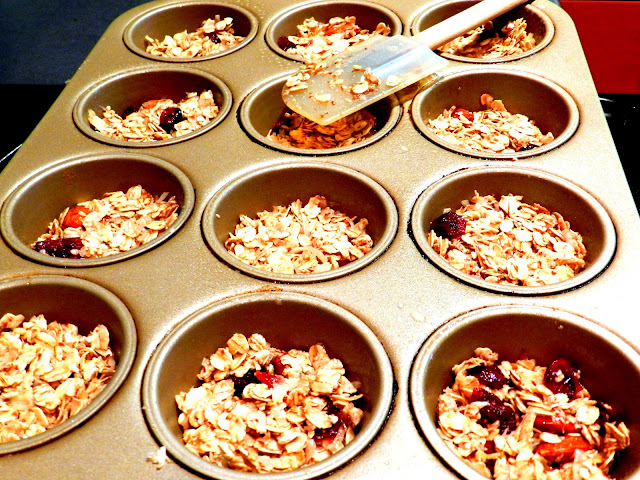
After the ingredients are thoroughly mixed, spoon the mixture into a greased cupcake pan like so. I used a pam to grease the pan and a spatula to really pat them down.


Next, put them in the oven at 350F for about 20 minutes until golden brown. Once done, let them cool completely. This step is very important and possibly the most difficult to complete. The smell is intoxicating you by now.


Once done, pop them out of the pan. As long as they're completely cooled, they totally hold together. Survey the fine work you did and enjoy! Look at you...making your own granola bars. How resourceful! And look, they're so cute...just like you!

Ingredients:
  • 2 cups rolled oats
  • 2 tablespoons ground flax meal
  • 1/2 cup maple syrup
  • 2 tablespoons canola oil
  • 1 teaspoon vanilla
  • 1/2 cup coconut
  • 1/3 cup raw almonds
  • 1/3 cup cranberries
Preparation:

Preheat oven to 350F. Mix ingredients in bowl and stir until all pieces are evenly coated. Spoon into cupcake pan and pat down with spatula. Bake for about 20 minutes until golden brown. Let cool completely and use a butter knife to rim the edges of each granola bite to pop out of cupcake tin.

To enhance your granola-eating experience, enjoy with greek yogurt and berries. That's all.

Nov 27, 2011

Motivation Monday + A Healthy Dessert

Hello friends! I hope you all had a wonderful Thanksgiving filled with good food and good company.

In last weeks Motivation Monday, I proposed a group challenge to make ONE healthy change for the week. So how did it go? Apart from Thanksgiving day, thanks to you and the accountability factor, I stuck to my goal! So, thank YOU.

Apparently, I'm not the only one with a sweet tooth. Like me, many of you chose to swap your evening sweet treat for a piece of fruit. I found that the first few days were a little tough but it got easier as the days went on.

It also got my creative juices flowing and helped me put together a dessert that I can honestly call "healthy". You know, one that tastes great but that you don't have to feel guilty enjoying. Enter: sugar-free hot cocoa. Not the store-bought version, but actually making it from scratch. HUGE taste difference! This recipe is all that you want in a dessert. It's warm, rich, chocolaty, sweet and oh so cozy. Plus, it won't make your pants feel in the least bit snug. Score!


So why is it "healthy"? I'm so glad you asked. First, low-fat or fat-free milk is a great source of protein and vitamins and minerals like calcium and vitamin D. Hello strong bones! Secondly, cocoa powder provides antioxidants, which helps protect cells against free radicals and cocoa may also lower blood pressure. Finally, sugar-free hot cocoa is very low in calories and has no refined sugar. Need any more convincing? I didn't think so. 


Artificial sweeteners such as Splenda, Equal or Sweet & Low are products that help cut calories, but should be used sparingly. There are no official recommended limits, but I personally try to limit my consumption to no more than 2 packets per day. 

....On to the recipe!

Ingredients:
  • 1 Tablespoon Cocoa Powder (I like Trader Joe's)
  • 5 oz Low-Fat or Fat-Free Milk
  • 1 Packet of Sugar-Free Sweetener (I like Splenda)
Instructions:

Mix cocoa powder, sugar-free sweetener and a tablespoon of milk in your favorite mug (very important) until powder is dissolved. Meanwhile, microwave remaining milk until hot. Mix heated milk with dissolved cocoa mixture, stir and enjoy.


Variations:

I love love love experimenting with hot cocoa. Here are some of my favorite ingredients to add once I've made the cocoa:
  • Peppermint Hot Cocoa: Add a drop of peppermint oil. Be careful that the drop is small because this is powerful stuff!
  • "Spicy" Hot Cocoa: Add a dash of cinnamon or pumpkin pie spice or (if you're brave) cayenne pepper
  • Vanilla Hot Cocoa: Add about 1/8 teaspoon vanilla extract

Nov 24, 2011

Our Thanksgiving

Where do I even begin? I have so much to be thankful for. I feel so blessed to have a loving husband and beautiful son. I am also reminded to be grateful for all of the "little things" (that really aren't so little): a roof over my head, clothes on my back and (of course) food on the table.

This year my Thanksgiving menu was simple. With no family nearby and friends out of town, we spent the afternoon together just the three of us. It was perfect and made the usual stress of cooking a holiday meal absolutely - dare I say - enjoyable. All the food turned out so satisfying and delicious, I wanted to share.

Did you use your handy meat thermometer? It's the only way to know for sure the bird is done.


One thing is for sure: I never seem to get used to preparing a turkey. It's pretty simple, I know. But the prep work just grosses me out. Thankfully, the final product is so yummy and satisfying, I forget all that unpleasantness.  


Pumpkin Pie using recipe on Trader Joes organic canned pumpkin and pie crust from Simply Recipes.


There were also dinner rolls using Pizza Dough by Giada but I wasn't able to take a picture before the boys got to them. The best part of the day was spending time with my family. We even broke out the Christmas decorations at the end of dinner. I'm pretty sure Will thought the lights were the best part of the evening.

Seeing the world from his perspective makes me thankful for life, love and our precious times together.

Nov 20, 2011

Group Challenge - Are You Ready?

Does your plate always look like this? Mine doesn't either.


Even with a Masters in Nutrition, I have to admit my diet isn't always perfect. There are weeks when I don't exercise enough. There are days when the donut shop calls my name. There are even moments when I just.need.a.cupcake! Even though I can name a million reasons why eating healthy and staying active are good for my health, why are there times when I let things slide?

It just goes to show that eating healthy isn't just about head knowledge. It's about putting that knowledge into practice everyday. And THAT is no easy task. Certainly, there are times when eating indulgent foods and getting less activity is okay. Taking a brief break can even be good for your health. Keyword: brief.

Let's be real - you know and I know that sometimes those "little" indulgences add up over the course of the day/week/month and become (gasp) our lifestyle. So let's make a healthy choice together. Better yet, let's make it a challenge - teamwork is just more fun.

Here's the plan: first, pick one thing you can do to improve your diet or lifestyle this week. One little thing. Doesn't have to be big, but it does have to challenge you. Next, post your goal for the week in the comments. Yes, post it! It's about accountability, my friends. The final step is to let me know how it went via a comment in next weeks Motivation Monday. This is a very important step, so don't skip it. Follow through - you can do it!

Make sure your goal is do-able. Something that challenges you but also something you can practically do. Here are a few examples:

This week I will ____________________
  1. Swap my evening sweet treat for a piece of fruit
  2. Eat veggies with lunch, dinner and a snack
  3. Make your grains 100% whole grain for at least 2 meals per day
  4. Drink at least 2 cups of low-fat or fat-free milk each day
  5. Increase your cardio by 10 minutes on 2 workout days
  6. Swap a take-out meal for a home-cooked one
How about it? Are you up for the challenge? If none of these seem challenging enough for you, then pick something else that would be. I'm definitely going with #1 since my normal 1 piece of dark chocolate has in the last few weeks become two or three pieces. Not cool Tiff, not cool.

Dear dark chocolate, sure you can be healthy in small amounts but I need less of you in my life.

Now it's your turn. What's your challenge this week?

Nov 17, 2011

In Love With Fall & A Great Salad

I'm totally in love with the Nor Cal version of Fall. I feel like we're soul mates. It's fresh, cool, crisp, and just BEGS you to wear cozy sweaters and Uggs. Not since I lived in the midwest have I seen trees this color...


Holy crap. Seriously? I'm in love.


Ok, back to business. Food business. Let's talk green healthy things. You need more of them in your life, am I right? I have an easy, delicious way to increase your daily dose of green vegetables. My friend made this great Persian-inspired salad at a dinner party a few weeks ago. It was so tasty and simple, I knew I had to have the recipe. Thankfully, she was nice enough to share it so I can pass on some green-love to you.

After she gave me the recipe, I made it WAY to many times. I still love it. The whole recipe just screams FRESH. Lemony dressing, cool mint, and salty feta make this a perfectly savory afternoon lunch or dinner salad.

I also like to add grilled chicken or garbanzo beans to up the protein. Oh, and eaten with flatbread? Don't even get me started! This is my life.


Lemony Romaine Salad with Mint and Feta
 
Ingredients (single serving):
  • 1 cup baby romaine salad mix
  • feta cheese crumbles (I used about 1/8 cup)
  • handful of cucumber slices
  • 2 tsp fresh lemon juice
  • 1 tsp olive oil
  • dried mint leaves
  • salt & pepper
Preparation:
Put salad in bowl, sprinkle with feta, cucumber and dried mint. Squeeze fresh lemon juice and drizzle olive oil over salad. Sprinkle with salt and pepper to taste. Mix it up and enjoy.

Oh, and you may have noticed some changes to the blog design. I'm trying to decide what layout and design I really want, but there are so many options! So, I'm still deciding. Hope the changes are not too distracting!

Have a great weekend! 

Nov 15, 2011

Post-Pregnancy Weight Loss

Attention ladies! If you're trying to lose post-baby weight, I have some real-life tips to share.

And even if you didn't just have a baby, but want to lose weight, these tips can help you too. Promise.

My advice goes beyond the basics. Yes, there's the low calorie diet thing. Yeah, ok, there's the exercise thing too. But it's more than that. It's more than just giving you rules to follow. There's a person behind all this. A person who cares for you and has totally been there.

This is very pregnant me in March 2010. I gained about 30lbs, then had to lose it. Real life.


About a year and a half ago when I had my son - my little bundle of joy - he filled my heart with love and my belly and thighs with much, much more. Totally worth it. But still, like many women, I wanted to get back into my pre-baby shape A.S.A.P and learned a few things along the way.

This was the first time in my life I had to lose real weight. Not just a few pounds...30 of them. Ok, technically about 23 after Will was born. But still! In my line of work, I'm used to giving recommendations on weight management. Losing weight, gaining weight, maintaining weight - I thought I had it all figured out. NOT! The first thing I learned after having a baby is that it's a lot easier to give advice about weight loss than to actually DO it yourself.

If you're one of my close friends, you know I struggled for the first few months. The weight just wasn't coming off. Why? I didn't trust what I knew. Bizarre. I blame the hormones. I knew I needed to eat enough calories to support breastfeeding and exercise. I knew my calorie and protein needs - I calculated them to the T. I knew what I needed to do. Did I do it? No.

Instead, I thought, "I'll just eat slightly less calories per day than I calculated and the weight will come flying off". Did it? No. It didn't. Why? Because I didn't trust what I knew. My initial lack of success frustrated me. Couple that with mental and emotional challenges of having a newborn and I was a hot mess!

So I decided after a few months to go back to basics....to what I knew. Start eating more calories in small frequent meals throughout the day. I continued exercising. After 6 months, I was back to pre-baby weight.

Me and my crazy-eyed friend. Back in shape and living it up at my best friends wedding in September 2011.


So what did I learn from all this? Trust what you know and be patient. It'll happen. Not overnight, but it'll happen.

Even though everyone has unique nutritional needs, here my general post-pregnancy weight loss pro-tips:
  • DO aim to lose weight at a healthy rate (i.e. about 1-2 pounds per week)
  • DO eat real food (no fad diets or crazy detoxes)
  • DO eat enough food (if you're breastfeeding, that's usually about 2,000 calories or more)
  • DO exercise moderately (about 30-60 minutes 5 days per week)
          and most importantly.....
  • DO be patient and stick with it!
Is it easy to lose weight? Not always. But it's worth it for your health in the long run. Remember to forgive yourself when you make mistakes. We've all been there. Just pick yourself up and start again. 

    Nov 13, 2011

    Motivation Monday

    For this Monday of Motivations, I wanted to give credit to all the great internet resources that inspire me.

    Some of my favorite sites are created by Registered Dietitians, a group of professionals that I know provide reliable, science-based nutrition advice. These - and others - constantly interest, challenge and motivate me to live healthy even when I'm not feeling it.

    Here are a few of my current favorites:
    • Always inspiring, Dietitian on the Run motivates me to break out my Nike's and go for a jog. How could I not after reading about her recent Marine Corps Marathon finish of 3 hrs 38 min? Wow!
    • For healthy, tasty recipe ideas, I turn to the other dietitian named Tiffany.
    • Thank you USDA for MyPlate, a much more user friendly visual of how we should eat.
    • To keep cooking interesting, I use Pinterest to collect my favorite recipes and then adjust to make them healthier.
    • When I'm feeling bored with my workout regimen, I like to checkout Oxygen Magazine's website for new exercise ideas.
    • And finally, this visual I saw on Pinterest helps me remember that it is ALWAYS possible to out-eat what you burn in the gym. Translation: even if you exercise regularly, try not to reward yourself too often with treats that are high in fat, sugar and calories. Instead, make healthy eating a priority and save the treats for rare occasions.


      Nov 10, 2011

      A Potted Garden and Arugula Pesto

      Gardening is about trial and error. Right? Please say yes, because for me it's mostly error.

      This Fall, I had high hopes for my potted garden which includes broccoli, sprouts and arugula. These beauties were supposed to provide delicious, healthy side dishes at a fraction of the cost. Well, turns out broccoli and sprouts take FOREVER to mature. Small oversight.

      Thankfully, arugula grows pretty quickly. It gives me the immediate gratification I need to have patience for the rest of the slowpokes to grow.


      Although my arugula is coming along nicely, it isn't quite ready to be sampled. Watching it grow each day beckoned me to make what I consider to be the yummiest spread around.....arugula pesto. It's green. It's fresh. It's garlicky. It's the perfect compliment to chicken...or fish...or bread....or whatever the heck you want to put it on! It's a party for your taste buds. True story.

      It starts with some delicious, spicy, fresh Arugula. Put a few handfuls in the food processor.


        Smash some garlic.


      Add garlic, parmesan cheese, walnuts (or pine nuts), salt and pepper. Start to blend and drizzle olive oil while blending.

      Blend blend blend until you reach a smooth consistency.


      As I mentioned, this pesto can go on just about anything, but last night, I opted to pair it with fresh baked salmon.


      Once salmon is done, spread a dallop of pesto on top. I sereved this main dish with rice and steamed broccoli. Lots of green = Lots of good.


      The toddler and the husband enjoyed this recipe. No leftovers. Once my arugula plant makes its debut, I plan on making this recipe again. Any pesto you don't use, you can freeze which saves you time and money! Hooray!

      Here is the recipe (Adapted from Arugula Pesto)

      Ingredients:
      • 2 cups packed fresh arugula
      • 2 garlic cloves
      • Salt and freshly ground pepper
      • 1/3-1/2 cup pure olive oil
      • 2 tablespoon walnuts
      • 1/4 cup freshly grated parmesan cheese
      Directions:

      Add all ingredients to food processor, excpet olive oil. Beging blending on low speed and drizzle olive oil in slowly until desired consistency is reached (about 15-20 seconds).

      Nov 7, 2011

      Motivation Monday

      Hello people! Motivation Monday is back because....it's Monday! And who doesn't need a little pep talk to start the week strong?

      My motivation tid-bit for you has to do with aging. What?! Yep, healthy aging. It's good stuff. Trust me.

      In my dietitian world, I see a lot of sick patients in the hospital and the nursing home. These people are ill for many reasons and oftentimes their illnesses were created or made worse from poor lifestyle choices such as an unhealthy diet and a sedentary lifestyle. Yes, a variety of factors influence overall health: genetics, stress, environmental factors, etc. However, eating habits and activity levels also play a dramatic role.

      Each time I go to work, I remember that eating healthy and living an active lifestyle isn't about fitting into a cute pair of jeans. That's nice too, of course! But eating more broccoli and limiting your sweets doesn't just help you look better, it promotes quality of life both now and as you age.

      So if you want to be on the healthy older adult train, be a healthy younger adult! This week, eat a few more fruits and veggies each day, save the sweets for a special occasion and get some exercise.

      My motivation to age healthy? A big one is to be a healthy mommy for my little bumble bee.... 

      Nov 3, 2011

      What's Living in your Kitchen?

      Do you know what's living in your kitchen? Chances are, more than you think. 

      Earlier this week, a health inspector visited one of the nursing homes I work at. The inspector took a walk through the kitchen and recommended we use bleach solution to sanitize because it kills Norovirus, a virus that can contaminate food and lead to food poisoning.

      Why am I telling you this? Because there's totally a take-home point! Norovirus could just as easily be in your kitchen as in a foodservice kitchen. Not to mention, there are a host of other nasty viruses and bacteria that could be nestled - all comfy cozy - in your kitchen. These germs can cause food poisoning and that's just not cool. So don't let those germs rain on your parade! It's your kitchen, not theirs!

      Here's the plan, the three essential steps to a thorough kitchen cleaning: wash, rinse and sanitize all surfaces and/or utensils that come into contact with food (i.e. sink, countertops, cookware, utensils, etc.)

      A few tools of the trade:


      First step: Wash with a detergent cleaner or soap

      Second step: Rinse with clean water

      Third step: Sanitize with a solution that contains bleach or make your own

      According to the National Food Safety Management Institute, these three steps should be taken every time you switch in preparing different food products (for example, from different types of raw meats or from raw meats to raw vegetables) or if any contamination is suspected (for example, you think raw chicken juices may have splashed on the raw broccoli).

      Be sure to lock up all your chemicals or store them where little hands cannot get them. 


      Of course these three steps should always be accompanied by other food safety precautions like frequent handwashing, cooking foods thoroughly and avoiding food preparation if you're sick.

      I know, I know. How is a sick MOM supposed to avoid handling food? Mom's don't get sick days, right? Well, my advice is to handle food served to others as little as possible if you're feeling sick. Break out your freezer meals or order food in. It'll be worth it. The only thing worse than a sick mom is a sick kid, right?

      I do my best to prevent germs from overtaking my kitchen, but a toddler? Well, by the looks of it, he and his truck forces have laid siege.


      As always, this post is brought to you by your friendly food safety nerd :)